都你Photoshop抠图技巧
抠图难吗?其实一点也不难,只要你有足够的耐心和细心,只须掌握最基础的photoshop知识就能完美的抠出图片。当然,这是靠时间换来的,我们应当掌握更简便、快速、效果好的抠图方法。抠图,也就是传说中的“移花接木”术,是学习photoshop的必修课,也是photoshop最重要的功能之一。这几天在研究photoshop抠图,个人纵观所有抠图方法无外乎两大类:一是作选区抠图;二是运用滤镜抠图。
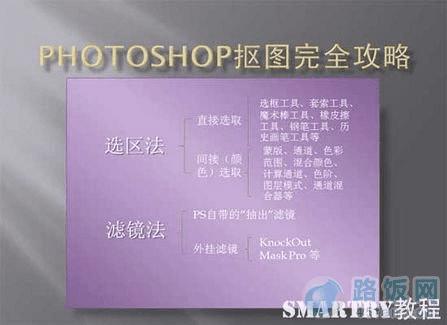
稍难点的抠图就是“抠发抠婚纱”,抠发,指的是抠细小的物体,如毛发等;抠婚纱,就是抠透明质感的物体,如婚纱、玻璃杯等。好了,我们就分三大类来解析一下photoshop抠图:
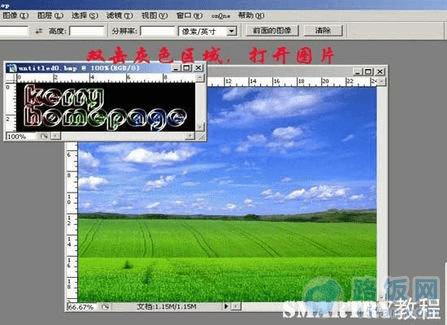
一、一步抠图——最原始最没有技术含量的抠图方法。
1、双击photoshop窗口灰色区域,打开两张素材图片。
2、移动图片至想要的背景图片上,把所在层的模式改为“滤色”。
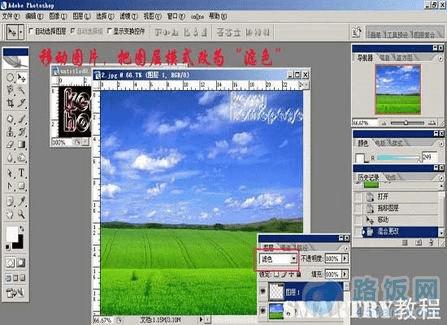
3、总结一下,黑色背景的图片用“滤色”模式;白色背景的图片用“正片叠底”模式。当然如果你想抠的对象本身有黑色或白色,那就另当别论了。

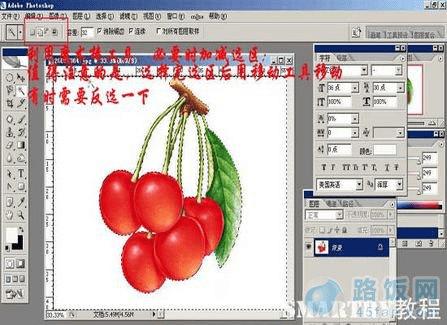
4、这种方法对于白色背景的图片,效果好像不是太好;所以我们就用另一种更简便的方法——魔术棒工具。这里之所以把它列举出来主要是,让你明白与黑色背景的图片对应着有这么一种方法。必要时进行加减选区,有时还需要反选一下;说明一下,Shift+工具,加选区;Alt+工具,减选区;Ctrl+Shift+I,反眩
5、最终效果图:

除用魔术棒工具外,利用套索工具和钢笔工具也是不错的选择,但最好用带磁性的套索工具和钢笔工具,在这里就不再赘述了。另外再说一点,就是在PS CS3版本中有一个比魔术棒工具功能更加强大的“快速选择工具(Quick Selection Tool)”,可以不用任何快捷键进行加选,按往不放可以像绘画一样选择区域,非常神奇。当然选项栏也有新、加、减三种模式可选,快速选择颜色差异大的图像会非常的直观、快捷。如果你有用CS3可以试一下。
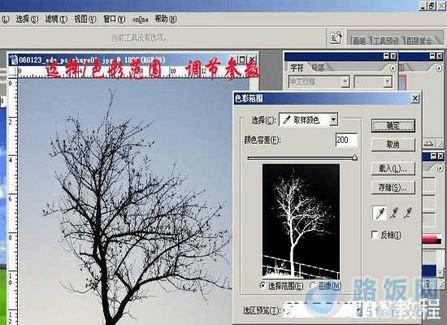
6、除了用工具直接进行选择外我们还可以用色彩范围进行选区的选择。注意一下,颜色容差值的不同得到的选区也就不会相同。不仅仅是色彩范围,所有带容差参数的均适用这个原理,所以我们在设置参数时多琢磨一下。
7、移动到新的图像中,得到的最终效果图。

这种一步抠图的方法只适用于图像成分比较简单、对图像质量要求不高的作品适用。
学习重点:
选区的创建;
扩展思维:
在选择哪种方法之前,应先分析一下图像的色彩构成,再灵活的运用各种工具及菜单命令来创建选区,达到事半功倍的效果。
我们更多的时候是希望得到高品质的图像,所以就必须掌握高手级的抠图方法。分两类来给大家讲解一下。
本文地址:http://www.45fan.com/dnjc/12377.html